Friday, July 26, 2013

RISOTTO CON POMODORO, PROSCIUTTO E PISELLI

YES! I've changed the background on the blog. I got tired of looking at eggs and thought a little distressed artwork would be a pleasant change. Besides, I saw the tiny Corot on the wall and knew I had to use it. One of my all time favorite painters! And the chair looks so well worn and comfortable . . . I could live in that space very easily. It reminded me of Rome, allora, ci doveva essere . . .

Risotto is a dish I have always cherished. I've written about it before - last September, all'Onda with large scampi. Be that as it may, it should be no surprise to anyone that risotto has many faces and since I was craving it with cherry tomatoes, I made some last night, but with the addition of a little ham and peas to finish it off. It really hit the spot. And, of course, the leftovers can be used for Arancini, which is precisely why I'm writing this blog entry. More to the point, someone sent me a link to another blog with a recipe for Arancini using sushi rice because of its sticky composition. This may be true, but Arborio or Carnoroli rice are no less dense once cooked and are perfect for making Risotto and Arancini. Sushi rice does not an authentic Italian rice ball make; if that were true, we'd be making our Toro and Unagi with Arborio rice - talk about going too far with this crossover and fusion business - the same, I AM AFRAID, should be said about panko versus real breadcrumbs. I can't help it that I'm a purist; it isn't Italian, I don't care what anyone says. LIke, "oh gosh, let's use panko flakes and mix them with the cheese, the ground fennel seeds, orange peel, and the oregano!" Egads! What's next? Soy sauce on your Panna Cotta?* You see my meaning, n'est çe pas? So that said, let us venture forth, treading lightly and never forgetting that we are Italians, if only for today. We shall use real ingredients, the fresher the better. And if it all came to you from a farm not 50 miles away from your door?  All the better for you! Don't forget: risotto should be cooked over a very low heat, so be patient. The rewards are great for those willing to do the work to attain optimum results.

Click on photo for larger image
Risotto con pomodoro, prosciutto cotto e piselli

3 tbs. Extra Virgin Olive Oil
3 tbs. butter (reserving 1/2 of it for the end)
1 small onion, minced
1 clove garlic, smashed and chopped to a paste
1/2 cup dry white wine
3 cups Risotto (I prefer Carnaroli)
4 cups simmering beef or chicken (or both; or veal if you really want to splurge) stock
1 flat cherry tomatoes (about 24), cut in half
3 slices prosciutto cotto or baked ham
Nutmeg
1/2 cup petite peas
1/4 cup heavy cream
1 cup Reggiano Parmigiano, grated

Heat a large, deep heavy-bottomed cast iron skillet (Le Creuset Dutch ovens are perfect for this). Add olive oil and half of the butter. Melt until sizzling and the bubbles begin to recede. Add onions, turn down the heat to low and saute until glistening and transparent (no more than a minute). Add the risotto and stir until all of the kernels are coated with oil. Add the white wine and cook until it has completely evaporated. Start adding a ladle full of stock at a time and stir constantly until almost all of the liquid has evaporated. Continue to add the stock in this fashion until it is completely used up.  After the second or third ladleful, add the tomatoes so they cook in the liquid with the rice. Grate a little nutmeg into the risotto. Continue to cook and stir. After about 10 minutes, add the ham. Continue pouring and stirring until the rice is completely cooked but still retains a little crunch. After the last ladleful of stock has been used, test the risotto for doneness. If it is still too al dente, continue cooking with hot water (never put cold liquid into a hot cooking substance - it will arrest the cooking process), as always, one ladleful at a time. The entire cooking time should be about 35-40 minutes. After you've finished adding liquid, add the peas and the cream. Continue to stir until all ingredients are incorporated. The risotto should be very creamy. Add the remaining butter with 1/2 the cheese. Stir until the butter has melted. Salt and pepper to taste, grate another 2 or 3 dashes of nutmeg and serve immediately.

Serves 8 (with leftovers to be used in Arancini if so desired)

* All of these nightmarish imaginings are not real per se, but they, and much worse have been seen on various food shows which cater to the lowest common denominator, i.e., the mob. We've seen Sandra Lee use Campbell's Tomato Soup for her lasagna and get away it: it's called murder - or suicide - by sodium. I was recently forced to witness a toilet paper unrolling contest on Rachel Ray (in the doctor's office waiting room). What does two fat women unrolling toilet paper on TV have to do with food? Absolutely nothing. I only wish these ersatz cooks' ratings would plunge so they could disappear into the vulgar obscurity they so richly deserve. They are the ruination of fine cuisine. Julia is spewing ashes in her cremated grave.

Sunday, July 21, 2013

MORE PASTA - AND TORTELLI ALLA ZUCCA

My grandmother used to make pasta almost every day. This was no easy feat. In those days, one had to put their back into it; especially if you were cooking for 6 people; any number no matter how large or small was a big affair. She always had to have food that was fresh. The butcher, the produce man and the fish monger were among her daily calls, but first, in the wee hours of the morning, before anyone was up, she made dough for pasta and dough for bread. Sometimes, she'd make the bread dough at night and let it rise in the fridge until early in the morning, but rest assured, by 7:30, the ethereal scents of yeast, olive oil and oregano roamed throughout the house. Pasta would be drying on towels and before you were even out of bed, the kitchen was spotless and places were set for breakfast. One must remember, though, that this was the Italian way.


There truly is nothing like making and truly succeeding in realizing fresh egg pasta. Those transparent sheets of pasta through which you can see your hand. I have made long, indeed very long sheets of straw-colored sheets that even I couldn't imagine were possible. The egg yolk is what gives the pasta dough its gorgeous color, but it also lends itself well to stretching. I pull the dough as I crank it through the roller of my machine, thus elongating it as far as it will stretch. It is a technique which requires patience and skill lest you break the sheet or tear it in any way.

I wrote about egg pasta on April 29th in my blog entitled Tagliatelle Fatta in Casa but I'm inserting the recipe here for your convenience.

Pasta all'Uova

3 cups flour
4 eggs
4 egg yolks

Beat the eggs and egg yolks and then pour them onto the flour in the bowl of a Cuisinart. Pulse for a moment and then turn it on and continue to mix for about a minute. Once the entire body of dough comes together and rotates around the canister in one piece and leaves no residue on the wall of the canister, turn the machine off. It is done.

Place the dough on a floured wooden surface and gently knead for a minute or two to form one round ball. Put into a bowl and cover with a damp towel to rest for 30 minutes.

In the process of making Tortelli all Zucca

This makes roughly 1-1/2 pounds of pasta. It is enough to make enough pasta for a good-sized lasagna pan (a large rectangular Pyrex dish, more or less). For noodles, it is enough for 6 people as a primo or 4 people as a main course. Remember, in an Italian household, there is always more food to follow and everything is in smaller portions than here in the United States. If you are making pasta for more than 4 people, add 1 egg and a 1/2 cup flour for each additional 2 persons.

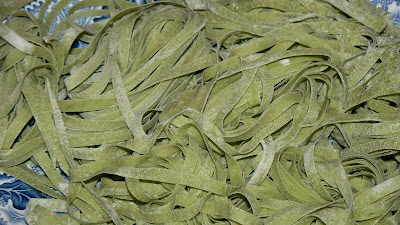
For flavored pastas, such as spinach, beet, tomato, even saffron, add 1/2 cup of puréed vegetables to the flour mixture and process in the same manner. For tomatoe, 1 tsp. tomato paste should suffice in the mix. For saffron, pour 1 tsp. hot water over 1 tsp. saffron, mix well until the strands have melted and colored the water. Beat the eggs with the saffron and add to flour and continue with the recipe as directed.

Spinach Tagliatelle
Beet Tagliatelle
For stuffing pasta (tortelli, tortellini, tortelloni, ravioli, agnelotti, etc.) add 1 tsp. milk for every egg.

As you can see from the photograph below, there is enough Tortelli alla Zucca for about 6 people. Another tray of this would be a hefty meal or double the people and you've got Thanksgiving Dinner's first or second course, which indeed this was. I always try to make sure there is a pasta course on Thanksgiving. It certainly comes in handy when you have a vegetarian or a vegan, or both, at the dinner table. I learned how to make Tortelli from a dear friend in Mantova named Amadea. She was one of the best cooks I ever knew and certainly one of the kindest women as well. Like my mother, she was a mother to one and all who came to her home  and she certainly taught me a lot about Northern Italian cooking: "non si mangia il pane colla minestra!" (Never eat bread with pasta!) In any event, mine aren't as good as hers (how could they be?) but I try. And try. And try.

TORTELLI ALLA ZUCCA

For the filling:

1 Acorn squash (halved, buttered and smeared with brown sugar, nutmeg, salt and pepper and roasted in the oven for one hour at 350º

When the squash is done, let cool and scoop out the flesh and put it into a bowl.

Add:

6 Amaretti (crushed)
1 egg
1/8 tsp. nutmeg
1/2 cup Grana
Salt
Pepper
Milk (for wetting the pasta)

Mix with a pastry blender or blend in a food processor until you have a thick but fine paste.

With a pasta cutter, cut a square about 2x2 inches. Take a demitasse spoon and scoop a bit of filling and place it in the center of the square. Take a finger tip full of milk and slide the milk along the edges of the pasta square and fold it into a triangle. Wrap the triangle around your index finger and press the corners with your thumb. The top of the triangle will be jutting out on top of your finger. Fold the top of the Tortelli back on itself and place on a cookie sheet lined with  a towel or parchment paper. Continue making in this fashion until you have the amount you want. I always allow 8 Tortelli per person as a second course (fish or seafood first). You'll probably have leftover filling. I freeze it for the next time.

It is wise to make Tortelli early in the day or even the night before, thus allowing the pasta to dry. If you must, you can refrigerate it but I wouldn't do it. It will be fine if you keep it in a cool, dry place until you're ready to cook them. This is painstaking and exacting work which requires skill and patience so it is unlikely that you will make these unless it's a very special occasion. Amadea made them traditionally on Christmas Eve, but she always made them for me when she knew I was coming to visit - even in the summer! Talk about love!

The Sauce!

2 cups heavy cream
1/2 stick unsalted butter
1 cup Reggiano-Parmigiano
1/2 cup golden raisins
1/2 cup pine nuts
8-10 leaves of fresh sage (stems removed and coarsely chopped)
Salt and pepper
Nutmeg
Sage leaves for decoration

Heat the cream in a heavy bottomed sauce pan. Add the butter and let it melt. Bring the cream to a boil and turn down the heat to the lowest setting. Add the cheese and stir to incorporate the cheese with the cream. You don't want any lumps. Add the sage, raisins and the nuts. Salt and pepper to taste and grate the nutmeg freely into the sauce. Keep in a warm place near the stove and dot with butter if necessary while the pasta is cooking.

Bring a large pot of water (about a gallon) to the boil. Add a handful of salt. Put the Tortelli in the boiling water and stir gently. The Tortelli will rise to the surface when they are done (3-5 minutes). Prepare a buttered oven proof dish and remove Tortelli with a slotted spoon as they finish cooking. When all the Tortelli are in the pan, fold in the sauce gently with a rubber spatula. Place a sage leaf on top of the Tortelli and serve immediately with grated Reggiano.

Buon appetito.


Friday, July 19, 2013

BÉCHAMEL SAUCE

After I mentioned Lasagna, you would have had to guess - correctly - that this would be the next step in preparation for a Lasagna Bolognese and a surprise or two to come along the way. 

There are two schools of thought about this sauce, the first being that it is a French sauce and the other being that it was Italian before it ever became French. It is a very well known culinary fact that Catherine de Medici brought many cooks and countless dishes to the French table when she married Henry II in 1541 (she even brought table manners to France!). In his Le Cuisinier François published 110 years later (in 1651) François-Pierre la Varenne called it a velouté. Even the bible of culinary arts Larousse Gastronomique fails to give more than a cursory paragraph describing the ingredients and the method. Legend has it that it was named after the Marquis de Béchamel. Whatever the case may be, it is a basic marriage of melted butter and flour (the roux) blended with scalding milk. 

Béchamel Sauce or La Besciamella

4 tbs. unsalted butter
4 tbs. flour
3 cups milk
salt and white pepper to taste
2-3 dashes of nutmeg

Place the milk on the stove over moderate heat, allow to come to the scalding point but do not boil (180º). While milk is heating, melt the butter in a larger saucepan. When the butter has stopped bubbling and has just started to brown, pour the flour into the butter and stir with a wooden spoon. Turn down the heat to low and continue to stir until all the flour has dissolved into the butter. Continue to stir until the mixture turns a light brown and emits a nutty aroma. The milk should be have reached the simmer by the time the butter has browned. Remove the butter from the heat and begin to pour in the milk. With a whisk, immediately start beating in the rest of the liquid. Place over the heat and bring to the boil, constantly whisking, and let the sauce thicken and boil for about 6-8 seconds on the heat. Remove from the heat and add the seasoning. You should have a thick, creamy sauce. If it is too thick, add a little milk or cream to even out the sauce. If you're not going to use the sauce immediately, dot the top with pieces of butter and cover with plastic wrap and keep warm on the stove until ready to use. 

This white sauce is the base for a Lasagna Bolognese. You can add 1 cup of Grana (to use Parmigiano-Reggiano  would be wasteful in my estimation) or Pecorino Romano and/or a variety of cheese (Taleggio, Fontina, Gruyere, etc.; NOT mozzarella). For my own lasagna (recipe to follow at a later, more seasonal, date), I sometimes add chopped spinach which has been cooked with butter and olive oil, shallots, and bits of pancetta or ham. The variations, however,  are endless.

N.B. Béchamel does not refrigerate well, but if you do refrigerate it, you can reheat it by adding driblets of hot milk. Reheating in the microwave* is not recommended.

* I LOATHE cooking with the microwave oven. There is something horridly wrong about it and I mistrust it intensely; it takes the soul out of food, and, therefore, eating. It is a crime against nature. Reheating leftover Chinese takeout is about as far as I'll go. 

Wednesday, July 17, 2013

BOLOGNESE RAGÙ

I usually make my ragù with veal stewing meat and one or two chicken livers but I came upon a recipe by Giuliano Hazan in Hazan Family Favorites which is made in the traditional way with chopped meat. Well, let me tell you, it was the most delicious Ragù alla Bolognese that I have ever made. The taste of the tomatoes united with ground beef (organic, mind you) was simply over the top - and you already know how much of a tomato mavin I am!

Before you make the ragù, which invariably ends up being used in lasagna, it's best to have a mise en place so that everything is at the ready because once you've started cooking this sauce, it all goes rather quickly as you add ingredients. N.B. you will see that the ratio from butter to oil is 4:1. Don't forget, even though Bologna isn't all that far north in the grand scheme of all things geographical, this is a Northern Italian recipe and they use far more butter than olive oil. It isn't for nothing that Bologna is called la Grassa (the "fat")!

Bolognese Ragù*

4 tbs. unsalted butter (half a stick cut up in pieces
1 tbs. olive oil
1 medium onion, finely chopped 
1 medium carrot, peels and cut into 1/4 inch dice
1 stalk celery, peeled and cut into 1/4 inch dice
1 tsp. fresh thyme, chopped extremely finely
1 tsp. fresh rosemary, chopped extremely finely
2 tsp. fresh Italian flat parsley chopped extremely finely

8-12 oz. ground beef (I prefer organic or I grind my own)
1/2 white wine
1/2 cup whole milk
1/8 tsp. freshly ground nutmeg

2 cans San Marzano tomatoes** (peeled in the their juices) OR
2 cans Crushed tomatoes
Salt and pepper to taste

Melt butter and oil in a large heavy bottomed dutch oven or saucepan. When butter and oil have stopped bubbling, add the onions and brown for a minute or two before adding the carrots and celery. Let them melt into each other and when the onions begin to become translucent, add the meat and break up with a spoon. Brown the meat until the meat has rendered all of its juice and continue to cook until about half of the liquid in the pan has evaporated. Evaporation in this recipe, as you will find, is an important step in achieving a dense "ragù."

Once most of the liquid has evaporated, add the white wine and boil that down until about half of that has evaporated. Add the milk and grate in the nutmeg and bring that back to the boil and let that evaporate until it begins to has a thick and creamy consistency.

Add the tomatoes and combine ingredients.  Bring to a boil and immediate turn the flame down to a simmer and continue to stir every so often. Simmer uncovered**, stirring occasionally for 3-1/2-4 hours. Salt and pepper to taste but use sparingly. Serve with whatever pasta you are going to use or reserve while preparing lasagna.

This sauce will keep for a week in the fridge if put into an airtight plastic container. It freezes very well for about a month. You can jar this sauce, and use throughout the year as I wrote about in making Passato di pomodoro, but I wouldn't do it. It's always better fresh.

* I want to mention here that Giuliano Hazan specifically mentions, and rightly so, that ragù, i.e. meat sauce, should never be used on spaghetti. This, indeed, is not the way Italians eat it. In fact, Italians never eat spaghetti or cappellini with meat sauce. The thinner noodles do not lend themselves well for the meat sauce to adhere to them well as do wider and more abundant shapes. Tagliatelle, fettuccini, and pappardelle, or any sort of macaroni, such as shells or farfalle or rigatoni, are far better suited for this sauce, besides Lasagna, of course.

** If you are using the canned peeled tomatoes, remove the tomatoes from the can and put them in a large bowl and crush them with your hands before pouring them, with the juice from the can, into the pot.

*** Because the sauce will become dense, you may have to cover it askew to prevent those big boiling geysers of lava-like sauce from splattering the ceiling and everything in between, but still allowing air to escape for the sauce to reduce gradually.

Sunday, July 14, 2013

ROASTED VEGETABLES

Roasting vegetables is fairly easy and it requires very little work on your part once you've got the vegetables ready to go into the pan and then the oven. I prefer to line my baking sheets with parchment paper as it cuts down on the messy burns on the sheet pan. I also like to roast them on my "convection roast" setting at 325º for about 45-60 minutes, depending on the vegetable. If you don't have convection, you should preheat the oven to 350º for a 45-60 minutes roasting time. Checking periodically is key as well. You don't want thinner slices of vegetables to burn while others are taking their good natured time (like carrots or fennel) to roast!

I like to assemble all the vegetables and prepare them each in their own turn. I do, however, for time and space considerations, consolidate the vegetables in the pan(s). Tomatoes are done separately; especially if they are cherry tomatoes and for that, I use a heavy cast iron pan.

2 boxes cherry tomatoes
2 tbs. olive oil
1 tsp. salt
1/2 tsp. fresh finely chopped thyme or about the equivalent of dried thyme

Pour the olive oil in the pan with the salt and thyme. Put all the cherries in the pan and roll them around with your hand until they are completely covered in the oil, salt and thyme. 

Put in the preheated oven and roast for about an hour. I like mine just a little more done than what is normally called for and if you like that, look for caramelized wrinkles at the bottom of the tomatoes and shrinkage**. 

Tomatoes prepped for the oven
Sometimes, I'll go the whole distance and make the effort to slice all of the tomatoes in half. The tops of the tomatoes glisten and most, but not all, of the juices evaporate. What is left, however, is rather outrageous; in fact they're almost sticky but ever so sweet. When I roast halved tomatoes like this, I use it for tomato and almond pesto (recipe to come soon), which I put on tagliatelle or tagliolini with bread crumbs.  

1 eggplant
2 zucchini
3 carrots
6 cloves garlic (un-peeled) 
1/2 lb. small bell peppers (tricolore)

Cut off the ends of the eggplant and the zucchini and slice them from top to bottom. Peel the carrots and cut them in half lengthwise.

Place parchment paper on two roasting pans and put the eggplant slices on one of them and sprinkle with salt to sweat them. After 15 minutes, turn them over and sprinkle some salt on them again. After 15 minutes, brush them with olive oil, turn them and brush the other side. Place zucchini in the same pan (there will be plenty of room in both pans for this) and brush the oil on them as well. Do the same with the carrots, salt the zucchini and the carrots and then put the garlic cloves in the pan. As you can see, I had a stray peach in the fridge, so I roasted that too, but ate it immediately after taking it out of the oven. Delicious!


Put all the trays in the oven (if you do it with the tomatoes, push the tomatoes to one side and make room for one of the trays in the middle rack and put the other tray on the lower rack of the oven. Roast for about 45 minutes and check to see if they are done. If the oil is bubbling and everything glistens, they're done, but always take a knife or a cocktail fork and see if the flesh is soft  when gently pressed. The garlic will be slightly brown and soft, but not mushy.


** Years and years ago - and I mean ages - there was a woman from Belgium who lived and cooked in the wilds of Wisconsin named Madame Cuny. She had a restaurant in the countryside as well as a restaurant and cooking school in downtown Milwaukee on the very fashionable Jefferson Street. She was a tyrant with her students as well as in the kitchen and she carried some of that demeanor into the restaurant unfortunately, which ultimately led to her demise as a business woman. However, I was there for lunch one day, with, in fact, the same person who dined with me recently at Pastiche (some friendships grow and last!) when I was in Milwaukee a couple of weeks ago. Well, to make a long story short, I can't remember what I had, but it was served with roasted whole tomatoes which were the most extraordinary tomatoes I have ever tasted. They were deep, deep Indian red with no skins but perfectly whole and even though they were somewhat browned, the juices which flowed from their tender flesh was indescribably delicious: caramel, oranges, anise, salt and yet it was always the tomato which stood center stage. I was transported and I told her so. In her very characteristic tone, she only sniffed in agreement and walked away. I'm sure she didn't want me to see her smiling.

WHEN IT'S TOO HOT TO COOK . . . LET THE DOGS DO THE ENTERTAINING!

With the mercury rising daily to somewhere around or above 93ºF, life, here in New York City,  has been pretty brutal. I have friends who couldn't take the heat, even at the beach with the ocean lapping at their legs; one friend got sick from searching for potted plants at the Union Square Green Market. Wise old sage that I am, I stayed home with puppy in air-conditioned luxury, which didn't seem so luxurious with the sun beating through the blinds at the height of the day, even at an internal temperature of 66º.  A trip to a puppy play date on Sunday on the bus with Ludwig to see his pal Pazzo seemed to be the coldest spot we could find - albeit temporarily. (Pazzo's house was deliciously gelid!)

The Pazzo & Ludwig Show - we want cold treats!
What, I ask, does one cook when it's this hot? Turning on the oven is definitely NOT something I want to do. Even the thought of  eating something as mundane as a real New York "slice" seemed out of step at this infernal juncture!

Not that I want to flaunt my sense of preparedness, but last week, I bought an entire side of salmon and in anticipation of something like this, I made gravlax. What's more, I also made some shellfish stock just in case and sure enough, I have found ways to avoid cooking with heat, if only barely. 

There are three things one does when it's this hot: carry out, deliver and cook "cold". I carried out and delivered some freshly roasted "Marie's Turkey" (for sandwiches) and her eponymous quinoa salad with red onions and - I think - swiss chard but it could have been kale (both from West Side Market at 110th Street, both $9.99 a pound, and both a little bit on the salty side). I also carried out and delivered three types of Melons (water-, honeydew, and cantaloupe), a big bag of Italian plums - which were ripe with desire and delicious! - as well as other condiments which would serve to be a future dish in one form or the other. So let me talk about those other dishes for a moment. 

You buy a couple of cucumbers, some yogurt (Greek thank you very much), a sack of little potatoes (red preferred), some dill, some beets, perhaps some fresh tarragon and then use whatever else you have in the fridge to create the following or any variation thereof:

Cold Cucumber Soup
Beet Borscht
Clam or Corn Chowder
Fruit Salad and/or any other salad as well

Of course, if you want to splurge and have an ice pack and a thermal bag or such, go to Fairway and buy wild Oysters for $.99 a piece and shuck away! 

Cold Cucumber Soup

2 whole seedless cucumbers (peeled)
1 qt. fish stock
24 oz. Greek yogurt
16 oz. Fat Free Sour Cream
Juice of 1 lime
Cayenne Pepper
Tabasco
Salt to taste
2 tbs. chopped dill
Dill sprigs for decoration

Take one of the cucumbers and slice down the middle and chop coarsely. Put them in a blender with 2 cups of the cold stock. Blend at high speed until completely emulsified. 

Pour contents into a large bowl. Spoon half of the yogurt into the blender and add enough liquid to cover.  Emulsify the yogurt and stock to become a thick liquid. Pour yogurt mixture into bowl of cucumber soup, mix well with a spatula. Repeat if you want more yogurt to thicken, add the remaining stock if necessary and mix well. Fold in the sour cream and mix well until all lumps have disappeared. 

Peel the other cucumber and slice as thin as you can by hand or with a mandolin. Fold in half of the sliced cucumber and see how it looks. I sometimes don't use the whole second cucumber because the slices take up so much volume. You want cucumber soup after all, not salad. Salt to taste (cold soups always needs over-salting, but do it gradually and taste with each mixing; especially with fish stock, a little salt goes a very long way. Add a couple of dashes of Tabasco, a dash of cayenne pepper, the chopped dill and the lime juice. Chill for about two hours and serve with a sprig of dill on top.

Beet Borscht

This is so simple it's almost laughable. Borscht can also be served hot as a clear, red broth served with a hot boiled potato and a dollop of sour cream and dill. 

3-4 medium sized beets
Beet cooking water
24 oz. fat free sour cream or yogurt (or both) 
Fresh dill
Salt and pepper

Put the beets in a  pot of water. Bring to a boil, turn down the heat, cover and cook for 45 minutes. Take off the stove, let it come to room temperature, peel the beets and refrigerate with the cooking liquid for 4 hours or overnight.

When you are ready to make the Borscht, peel the beets, and strain the beet juice (twice) through a fine mesh sieve lined with cheesecloth or a paper towel; you want to ensure that there is no dirt in the beet stock. 

Take two of the beets and put them in a blender. Add enough juice to cover and emulsify. Pour contents into a large bowl or saucepan (I use a no. 8 round Le Creuset covered Dutch Oven, which is perfect for this). Bit by bit whisk the sour cream and/or yogurt and the rest of the beet stock into the bowl until creamy. You want to go slowly so there are no lumps. Alternately, you can use a blender as directed in the cucumber soup. 

When everything is combined, slice the rest of the beets into julienne strips, add to the borscht with some chopped dill and refrigerate for at least 2 hours. Serve by the glass or in a bowl with a dollop of sour cream and a dill sprig.

Corn/Clam Chowder

Bacon and corn and clams - - - YUM!

1 tbs. butter
1 tbs. olive oil
1/4 lb. diced slab bacon
1 onion, chopped
1 clove garlic, smashed and minced
1 stalk celery, peeled and minced
8 cups combined corn water or fish stock (unsalted)
1 bottle clam juice (for clam chowder)
2 cups milk
2 lbs. potatoes, washed but not peeled - if using large Idahos or Yukon Gold, cut them in 
   quarters, if using fingerlings or new potatoes, keep them whole
3 ears corn (kernels removed
Several leaves of fresh tarragon or 1 tsp. dried 
Salt and pepper
1/2 cup cream
Cayenne and Tabasco (optional)
Scallions (optional)
2 doz. clams in the shell*** (for clam chowder) or if you're in a pinch,
1 can chopped clams

Heat butter and oil with the bacon over moderately high in a large pot. Swirl the bacon around the bubbling butter and oil until you get a good grease melt going on the bottom of the pan and the bacon bits begin to glisten at the edges. Lower the heat and add the onion, the garlic and 1/2 tsp of the tarragon and sauté until the onion becomes translucent. Add the celery and sauté until tender. Add the cooking water from the corn, the fish stock and the milk, turn up the heat, bring to the boil and turn down heat to a simmer. Add the corn cobbs, cover the pot and let steep in the liquid for about 30 minutes. After 30 minutes, add the potatoes and let cook covered for another 20-30 minutes. Take a potato masher and coarsely smash the potatoes in the soup. Add the corn kernels and the 1/2 cup cream, bring to a boil again and lower heat to a simmer. Cover the pot and let cook for 20-30 minutes**. Soup should be thick and creamy. Correct seasoning, add a dash of cayenne or tabasco, the remaining tarragon and the chopped green parts of the scallion, cook for 5 more minutes and serve. 

** Always keep an eye on the soup, stir occasionally to prevent scorching at the bottom of the pan. If you need to, slide the pot to the side and cook on only half of the burner while simmering. 

*** You may add the fresh clams during the last 5-10 minutes of cooking time if you want to make clam chowder. Make sure all the shells are opened before serving.

Melon in any form

A couple of honey dew or half a watermelon or a canteloupe or all three depending on how many people.

Dice the melons
2 limes (juiced)

Put the melon in a bowl, drizzle lime juice on the fruit, cover and chill in the fridge.
Serve. 
Easy as melon pie

Eet smakelijk! (That's Dutch for bon appetit!)


Sunday, July 7, 2013

BEEF STOCK/CONSOMMÉ

SINCE I just wrote about beef consommé, it is only natural that I should include the recipe for those of you purists who might want to have a container or two in the freezer for just one of those moments I shared in the previous recipe. If you must use the packaged stuff, College Inn makes the best consommés/stocks and if you're really in a pinch and absolutely have no other alternative, the Knorr chicken and beef stock cubes are the best (but beware: they are highly salted!). All others . . . better to make your own.

Stocks in general are very easy to make; it's just the matter of time. To make myself perfectly clear here, you don't have to do much, but you must watch and wait, refrigerate, de-grease, reheat and then clarify. All in all, a process which may or may not, according to your own timetable, take up as much or as little as two or three days. Given the fact that you are investing so much time, with so little effort (to be realistic here), it is always best to make vast quantities of it and store in the fridge (up to a week) or in the freezer (up to a year). Some may say that a year is overkill, but I have stored some stocks in the freezer which I completely forgot about (octopus, shellfish, even pork) and used more than a year later and found that they were perfectly intact and rather tasty, too. Of course, a very good freezer is key here.

Anyway, there are two kinds of stocks: a white stock and a dark stock. White stocks use bones in their natural composition. Dark stocks are made from bones which have been slowly roasted to bring out the most amount of flavor. There really isn't much difference in the ingredients or the process, except for the roasting and the recipe below can be used for both types of beef and/or poultry. Some of the steps differ but not too much, as I will explain.

Since I used a dark consommé for the preceding Orzo and Kale recipe, I shall set down here how I make my dark beef stock. However, when I make Tortellini in Brodo, I use veal bones and a veal shank (see below) for my stock and consommé which I think is the queen of stocks (I am including the recipe below). If you make your stock with love and patience, what you will get is liquid velvet.

BASIC DARK BEEF* STOCK

4-5 pounds beef bones (I save mine in the freezer from steaks, ribs, etc., and add fresh ones from the butcher)
1-2 beef shanks
One large onion, peeled and diced
3 carrots, peeled and cut into medium dice
1 large leek  (white part only) chopped, save the green part of the leek for later
4 stalks celery peeled and cut into large dice


1 tbs. extra virgin olive oil

Heat the oven to 400º 

Place vegetables, bones and shank(s) on a lightly greased chef's roasting pan and roast the bones and shanks for about 1-1/2-2 hours. Turn the ingredients a few times during roasting. The shanks should be browned and the marrow softened and shrinking from the bone. 

Removed bones and vegetables and place in a large, 12-16 quart stockpot. Pour the grease from the pan out and pour some water into the roasting pan and place on the stove over medium heat. Scrape off as much of the remains from the bottom as you can during the cooking and then pour that into the stockpot as well. Fill the pot with cold water (about 2 gallons) and set over moderately high heat. Bring to a boil and immediately lower the heat and skim off any scum while it simmers. Once you have removed the scum, add 

2 medium-sized tomatoes, chopped

and cover the pot and simmer anywhere from 2-4 hours.

While the stock is simmering, make a bouquet garní as follows:

One can make a bouquet garní with cheesecloth, OR you can make one with the wide green leaves of the leeks.


3 sprigs fresh thyme
5-6 large leaves fresh sage
1 whole stalke fresh rosemary
4-5 sprigs fresh parsley
8-10 whole black pepper corns
1 bay leaf


Take two of the flattened green leaves of the leef and place them flat on a cutting board. Place all of the herbs, the bay leaf, and the peppercorns on the leeks and start to roll the leaves to contain the herbs. Cover these two leaves with two more leaves of the leek so you have a nice circular package. Take some kitchen twine and tie the bundle at the far ends like a log. It doesn't matter if some of the herbs are protruding at the open ends. The twine will keep everything in place (I sometimes use wide rubber bands that I have saved from asparagus or broccoli bundles, which work perfectly for this). 

Add the bouquet garní to the stockpot, cover and continue to simmer for several hours. 

(For a white stock, do not sauté the vegetables, but rather, add the bones, the meat, the vegetables and the herb bouquet in a stockpot full of water and continue with the recipe.)

When the stock is finished, remove from the heat, and let it cool completely. You will need a large china cap strainer (or two large mesh strainers, cheesecloth, and another stock pot of roughly the same or slightly smaller size.  Remove as many bones as you can with a slotted spoon as well as the shanks and the bouquet garní. You can save the meat for another use (I usually use it for filling or for soup; I salt and pepper the marrow and eat it with bread and butter almost immediately, glutton for marrow that I am!). Take a large piece of cheesecloth, double it up and get it wet. Squeeze out the excess water and line the strainer with it. If you are using two strainers, line the first one and put the other strainer on top of the one with the cheesecloth. Strain contents of the stockpot into the other stockpot. Discard the vegetables  Refrigerate over night. 

The next day, take the stockpot out of the fridge and remove all pieces of fat that have hardened on the top of the stock. The stock itself, should be somewhat gelatinous in its cold form.

To make BEEF CONSOMMÉ, you will need:

3 egg whites
1 stalk of chopped celery
1 small carrot  (chopped)
1 medium-sized onion, chopped
6 peppercorns
1 tbs. dried tarragon
1 tomato chopped
1/2 lb. chopped meat (NO MEAT for poultry consommé)

Mix all of the ingredients together as if you were making a meat loaf. Add everything to the cold stock and place over high heat. Stir often to make sure nothing sticks to the bottom of the pan. You want all of the ingredients to break up as much as possible to absorb the liquid. Continue to stir while the stock heats. As soon as the liquid starts to boil, STOP STIRRING! You will see all of the ingredients begin to foam and rise to the surface and form one large mass. Turn the heat down to a simmer. You want the liquid to bubble and you will see the mass form craters on the surface. Allow it to continue in this fashion for about an hour and do not disturb it in any way. The albumen from the egg white draws all the bacteria and fat from the stock to create a delicious, rich and completely fat free liquid.  After an hour or so, the top of the mass will have formed a crust. Leave it to rest for a bit; the mixture will retain its shape and gradually sink to the bottom of the pot. Strain the stock into another pot exactly as you did with the first stock and use immediately or store it for future use as discussed above. I should mention here that with a clarified stock as this one or especially the one below made from veal, you have here that basis for what is called Sauce Espagnole, which in turn can become demi-glace. In fact, the possibilities are endless what you can do with clarified stock.

VEAL STOCK

Everything is basically the same, but for the best, and I mean THE BEST veal stock, use:

Neck bones, the shank and a veal tongue

Do not brown the tongue, but add it with the water. The process is exactly the same as the beef stock (and consommé) with the exception of adding the tongue to the liquid. When you've finished cooking the stock, the outer skin will have to be removed and you can then use the meat from the shank and the tongue for whatever you chose to make. I often use the tongue, sneaky devil that I am, and the shank, including the marrow in sauce for Lasagna. People who are squeamish about tongue never know and always say how delicious it is. Then I tell them . . . 

Buon appetito!

 *For a richer stock, Jacques Pepin recommends using Beef, Veal and Chicken bones simultaneously. If you collect bones of all sorts like I do, then by all means use them all at once. Just make enough stock so you can freeze it in separate containers for multiple uses.

Friday, July 5, 2013

ORZO IN BRODO WITH KALE

I must admit that I resisted, but finally, I have discovered kale. This does not mean that I hadn't ever eaten it before, but, rather that I hadn't really cajoled it into something that was appetizing to me, made by me and consumed not once, not twice but thrice in two days! This shouldn't be an extraordinary phenomenon for me - I have made something the same way more than once, and in the same day no less - but there was something about the whole process that was so completely delectable and SO EASY, and SO HEALTHY, that I shall now profess the wonders of this leafy member of the cabbage family to everyone I know.

There are several varieties of kale but for my purposes, and this recipe, I used organic baby kale. Very leafy vs. curly. It's up to you, but I prefer the flat leaf over the curly. It's a personal quirk of mine. I feel the same way about parsley. In any event, if you don't know this, kale contains very high amounts of beta carotene and is rich in calcium. It is also known to possess "indole-3-carbinol," which can help to impede the growth of cancer cells. It can even help to lower cholesterol and decrease dietary fat. Steaming and stir-frying are said to be the best way to prepare kale so, let's talk about that.


ATTENTION vegetarians, vegans and those of you who eat gluten free: this recipe is for you! For this dish, I used baby organic kale, which is very leafy and is as delicious raw as it is cooked. The first night I made it I was in a hurry and didn't really feel like cooking a lot (it's been in the high 80/90s here and extremely humid for weeks now), so, I sautéed one onion chopped with one clove of garlic in olive oil and then added a large handful or two of kale to the pan with a ladle-full of beef consommé. I seasoned it with some Kosher salt and black pepper and I couldn't believe how delicious it was. After we ate the first batch, I made another which was equally as delicious; especially with the added squirt of fresh lemon juice. I'll bet it tastes fabulous with pieces of diced bacon and I'll bet dollars to doughnuts that Oysters Rockefeller are fantastic with kale! Perhaps on this year's Thanksgiving menu . . .

Last night, however, I wanted something more substantial but I also didn't want to make a big production of it either. It being the Fourth of July, we didn't want to have to venture out for dinner or deal with the mobs on the river for the fireworks, so I came up with the dish pictured above. It is simple and I'm sure has been made countless times by a great many people the world over. Nothing is quite so delicious as those little surprises you make that are what I call "the money dish."

ORZO* IN BRODO WITH KALE

4 cups beef consommé (salted)*
1 onion chopped coarsely
1/2 leek (white part only) julienned
1 small carrot peeled and julienned
1 clove garlic smashed and chopped coarsely
1 tomato chopped coarsely
2 tsp. fresh thyme
18 leaves fresh basil (chiffonade)
1 lb. orzo

1 lb. kale (prepared as described above)

Heat the consommé and add vegetables. Bring to a boil and turn down heat to simmer and cook for about 10 minutes. Bring back to the boil, add orzo and cook until done (about 10 minutes). You will know when it is done when the orzo begins to gain volume and eats up most of the consommé and binds with the vegetables. When you have finished adding the vegetables to consommé, start cooking the kale. The kale should wilt and turn a very dark green. Add a ladle-full of consommé when necessary to help the cooking along. You will know when it's done as it begins to gather into a mass. There should be only drops of liquid in the pan. 

Once the orzo has cooked, spoon it out into soup bowls and, with a pair of tongs, take a fair amount of kale and place on top of the orzo and serve.

Eat kale! It's good for you.

Buon appetito!

*   Using orzo for this recipe is only one way in which to make this delicious dish. You can use
farro, quinoa, risotto or even pasta shells (which, I'm sure, as a minestra would be outrageous.

** Consommés and stocks should never be salted until you are ready to use them.. 


Tuesday, July 2, 2013

Apricots, Figs, Strawberries . . . JAM!


I was able to find figs and apricots in large quantities and my sister had a major stockpile of strawberries in the house so I thought I'd do a summer thing and make Jam. Let's start with strawberries. All of the recipes for jam should employ a candy thermometer.

Strawberry Jam

2-3 pints of fresh strawberries hulled
3 cups vanilla sugar
Chopped rind of 1/2 orange
Chopped rind of 1/2 lemon
Juice from 1 lemon

Combine 1/3 of the strawberries with 1/2 cup of the sugar and pulp the mixture with a potato masher. Warm the strawberries gently to soften a bit. Add the rest of the sugar with the orange and lemon rind in a saucepan large enough to hold contents. Stir gently and shake the bottom of the pan periodically to prevent them from sticking to the bottom of the pan.  Once all the sugar has dissolved, add lemon juice and turn the heat up. Once the strawberries reach a full rolling boil, continue to boil rapidly for about 10 minutes.  Check for doneness by either using a candy thermometer and inserting it into pan once the strawberries begin to boil and reach 220º F. Or, take a very cold plate (I put one in the freezer when I start making the jam) and put a drop of jam on the plate and let it cool. Press you finger gently into the jam. If it wrinkles, it's done.

Strawberries

Fig Jam

1-2 dozen figs.

2 cups vanilla sugar
Chopped rind of 1/2 orange
Chopped rind of 1/2 lemon
Juice from 1 orange

Cut of stems and  quarter the figs. Place figs in a saucepan and cover with the sugar, the rinds and the orange juice. Bring to a rolling boil, then lower heat to a simmer and insert candy thermometer in exactly the same fashion as the strawberry jam.  Fig jam becomes very dense very quickly so always remain close to the stove to monitor its progress. Stir often. You'll know it's done when it is very sticky. I add 1 tsp. vanilla, 1/2 tsp. almond extract, and 1/8 tsp. orange extract at the end. I also take an immersion blender and blend the jam into a dense purée. As always, test with candy thermometer at 220º F. Or the cold plate method.

Apricot Jam

12-18 Apricots (halved and pitted)
2 cups vanilla sugar
Chopped rind of 1/2 orange
Chopped rind of 1/2 lemon
Juice from 1 lemon

I have found that macerating the apricots are okay if you want to keep the syrup for another use - and there are many - but for jam or preserves, you really don't need it unless you want to make apricot butter, or in my case, if I'm making a Clafoutis or a pastry with flavored apricots, which, now that it's summer, will be often. If you do want apricot syrup*, though, you should drain the apricots, reserve the syrup and start again with the fruit and more sugar. So, that said, place all ingredients in a stainless steel saucepan and bring to the boil. Turn down the heat to moderate and simmer at a rolling boil until the temp reads 220º on a candy thermometer. Apricot jam should retain an apricot "color." . Take off the heat and stir. If the apricots are bobbing around the pan, the sugar is heavier than the fruit and must be cooked for another 2-5 minutes. Here is where the cold plate method mentioned above is so useful. If it runs, it's not done. If it wrinkles with a press of the finger, voila!

All of these jams should be jarred in canning jars; fancy jam jars can be used as well, but they should all be sterilized in boiling water before use. Always pour the jam in the jars while still hot but you should let stand for about 10 minutes or so to cool slightly before filling.

If you want to keep these jams for months you must immerse the jars in boiling water to create the vacuum, you must also make sure that there are no air bubbles in the jam before you close the jars. Always leave at least 1/4 inch of room between the top of the ingredients and the jar cover. After boiling in water, let the jars cool in the water and remove. Store in a cool dry place until use. Once opened, they must be refrigerated. If you don't intend to store the jam for a long period of time, it is recommended that you allow it to come to room temperature and store in the refrigerator.

* There are myriad manners of using apricot syrup. You can spice them with cinnamon or even do something savory with rosemary or mint; I'm sure half, if not most, of the mixologists the world over have thought up concoctions using this very thing. It's certainly better than the canned stuff no matter what flavor it is.

Monday, July 1, 2013

APRICOT CLAFOUTIS

This is what I make when I have too much fruit. I have only made this a few times and I must A Clafoutis (clah-FOO-tee) is one of the most deliciously delicate dishes one could possibly serve for dessert on any occasion. Perhaps, it's because of the abundance of fresh seasonal fruits, but somehow, something about it screams summer and hot weather, even if it is served piping hot or just warm.  I served this Apricot Clafoutis with a drizzling of Apricot Syrup, which I make from the macerated apricots.

Apricot Clafoutis
Serves 6-8 people

18 apricots, halved and pitted.
2 heaping cups sugar
1 tsp. vanilla
1/2 tsp. almond extract
1/8 tsp. orange extract
Juice of one lemon

Place all ingredients in a large bowl or any kind of container which you can cover, except plastic. A medium sized saucepan with a cover works very well for this.

Stir gently with a rubber spatula to incorporate everything and let sit covered at room temperature for at least 4 hours (overnight is best). Set aside.

When you're ready to make the Clafoutis, butter a large oval heavy bottomed ceramic or oven-proof porcelain dish that is at least 1-1/2 inches deep and measures about 9x5 (see photograph) and set aside.

Preheat oven to 350º F.

For the Clafoutis take

2-1/2 cups milk
2/3 cup sugar
6 eggs
2 tbs. vanilla
1//4 tsp. salt
1 cup flour
Electric blender

The macerated apricots should be swimming in syrup by the time you are ready to put them into the oven. Drain the apricots and save the syrup. 

Place all ingredients in a blender in the order in which they are listed. Cover and blend at top speed for at least one minute. Pour about 1/4 inch of liquid into the casserole dish and place on top of the stove ove moderate heat. Keep the dish on the heat until a film of batter has set at the bottom of the dish (rather like an omelet). Once you start to see a crust forming at the bottom, remove from heat. Arrange the drained apricot halves (cut side down) in a circular pattern starting from the outside edges and working your way in to the center. If you have extra apricot halves find gaps and holes in the batter to fill. Pour the rest of the batter into the pan and place on the middle rack of the oven and bake for at least one hour. When the Clafoutis puffs and shrinks away from the sides of the pan, it should be done. However, it is always best to check by inserting a toothpick which will come out clean if it is done. 

Let cool for about 15 minutes and dust the top of the Clafoutis with powdered sugar and serve.

Let cool just a bit and sprinkle a generous amount of powdered sugar on top.

Serve hot or warm. You can take the apricot syrup and pour a drop or two on top if you like.